A well packed and fitted backpack makes carrying even the heaviest of loads seem effortless. In this article, I'm going to explain the ABCs and bricks & mortar methods I use for packing my backpack and discuss how you can adjust your backpack for a perfect fit.
The ABCs of Backpack Packing
A - Access
The first step to packing your backpack is to divide your gear into categories based on how necessary each item is while on the trail. I classify each piece of gear I am bringing into three "Access Categories."
1) Camp Items
These are the items that can get packed way down at the bottom of the backpack, because they are only needed when in camp. It would be very rare to have to pull any of these out while hiking.
Sleeping Bag
Food Bag (with snacks removed)
Stove
Fuel (packed below food)
Camp Socks
Camp Shoes
2) Frequent Use Items
These are the small items that are commonly used while hiking. Most of them live in an essentials bag, the brain of the backpack, pants pockets, or the small pocket found along the waist strap.
Sunglasses
Sunscreen
Lip Balm
Headlamp
Snacks
Map
Phone or Camera
Small Notebook
Pen
3) Likely Use Items
These are the items that will likely be need or are important to keep handy. Keep most of these items either in an external pocket of the backpack or packed at the very top so they only require a few seconds to reach.
Insulating Layer
Rain Gear
Water Filter
Pack Cover
Gaiters
Trekking Poles
Make sure to pack your gear in the correct order. Otherwise, you may find yourself in a sudden downpour with your rain gear stuffed WAY at the bottom.
Take stock of what you are bringing. Is there redundant gear that could easily be left at home? Remember, each item you take along adds weight and increases the amount of time needed to pack and stay organized. A few versatile pieces of gear can go a long way to making your travel more enjoyable.
Pro Tip
Line the inside of your backpack with a contractor bag before you begin packing. The bag will allow everything to stay dry, and it cost less than a dollar! If you are traveling in a chronically wet area, consider investing in a pack cover, which will add another layer of moisture protection.
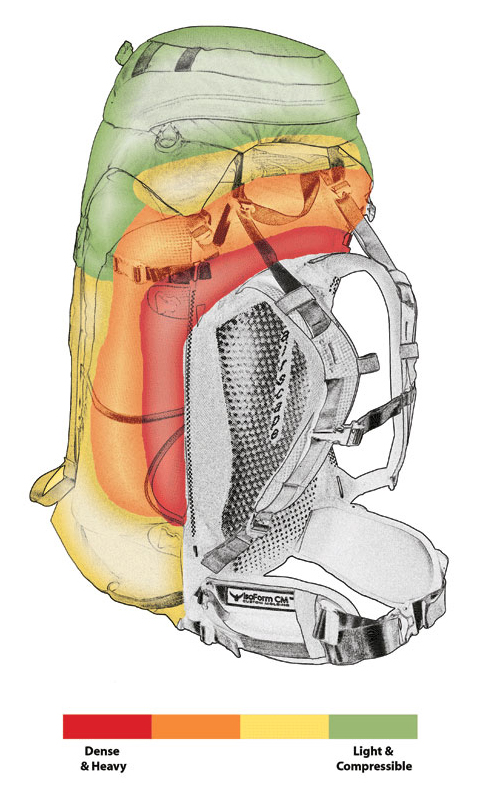
B - Balance
Balance refers to how the weight is distributed throughout your pack. There are two main rules to follow when thinking about balance:
#1 - Heavy items close to your body and midway up your back.
#2 - Even distribution of mid-weight items side to side.
The two heaviest items are your food bag and your water, so pay special attention to where those are being packed. Keeping the weight close to your body greatly reduces the outward pull on your shoulders. Keeping the backpack balanced helps maintain your normal center of gravity for increased maneuverability.
If you are traveling off-trail on rough terrain, consider packing your weight lower in your backpack. This helps to lower your center of gravity and create a more stable feel. Men typically have a higher center of gravity than women. Try out placing your heavy items at a few different heights until you know what feels best for you.
At this point, you should have three piles of gear separated by access needs and identified your heaviest items. Now it's time to start putting everything in your backpack.
Bricks & Mortar
Before you start, picture a brick wall. There are two main components to that wall: the bricks and the mortal squeezed in between the cracks.
Your packing should mimic this bricks and mortar system. Certain items, like your food bag, tent, and sleeping pad, are the "bricks." They are large items that cannot be easily squashed or manipulated.
Sleeping Bag
Food Bag
Sleeping Pad
Tent
Other items, like your clothes, make for perfect "mortar." They squeeze into the cracks between the bricks, creating a dense wall of gear.
Clothing
Book
Toiletries
Begin packing by pushing your sleeping bag way down into the bottom of your bag.
Pro Tip
Some backpacks have a dedicated sleeping bag compartment. I recommend leaving that zipper open and loading everything from the top opening of your backpack.
Next, layer one or two more of your "bricks". Fill in any gaps with clothing or other mortar materials, keeping in mind the access needs for each item.
Push down hard. A tightly packed backpack carries a lot easier and gives you more room to pack.
Once everything is squeezed tightly into your pack, flip the brain over the top and tighten the vertical straps holding it in place. Make sure to also tighten the brain straps above the frame of the back. The brain should sit neatly on top of the backpack, not flopped to one side or the other.
Then, begin to tighten all the compression straps found along the outside of the bag. Once again, tighter is always better. Punch and feel around on the outside of your backpack, looking for empty spaces that feel soft. If you find any, squeeze another piece of mortar gear into the space or just continue to push everything down further into the pack. Once the pack is fully compressed, there should be no flexing if you push down on the top of the bag.
S - Streamlined
New innovations in internal and perimeter framed backpacks have changed the way we pack. Gone are the days when clipping and tying gear to the outside of the backpack was a standard method. Now, only a few select items are found outside a well packed backpack, such as an ice axe, trekking poles, or perhaps a sleeping pad. A streamlined backpack keeps your gear tidy, increases your level of maneuverability in bushy conditions, and eliminates the worry of losing items that fall off the backpack.
Streamlining is closely tied to creating a well compressed pack. You can further streamline by making sure any items left outside don't go outside the boundaries of the backpack's silhouette.
Sleeping pads are the most common culprit. Try attaching the pad vertically along the outside of the pack instead of horizontally. Depending on your model of backpack, you may need to use a short length of p-cord to tie it down.
Backpack packing is an art, and practice makes perfect. Luckily, there are many opportunities to improve your packing system on a backpacking trip!
Loving this? Sign up and get the latest goods delivered right to your inbox.
How to Properly Fit a Backpack
Backpacks are extremely versatile in their ability to change sizes and fit a range of body types. However, the most important step to having a well fitted pack is to make sure you've purchased one that fits both your back and your waist.
First - determine the length of your torso by running a tape measure from the most obvious spinal protrusion on your neck (C7 vertebra) to the midline between your hip bones. Use this measurement when referring to backpack sizing specifications.
Second - find a correctly fitting hip belt that can accommodate the extra girth that clothing will add AND the girth reduction that happens with water loss throughout the day. Many backpacks can swap out hip belts, so if you are a medium sized toso with a small waist, that's okay!
Remember, the first priority is to find a backpack that correctly fits your torso.
Great! So you've purchased a backpack that fits your body, and you've packed it using the ABCs. Now it's time to lock in that perfect fit to make carrying it seem (almost) effortless.
Step #1) Adjust the Frame Size
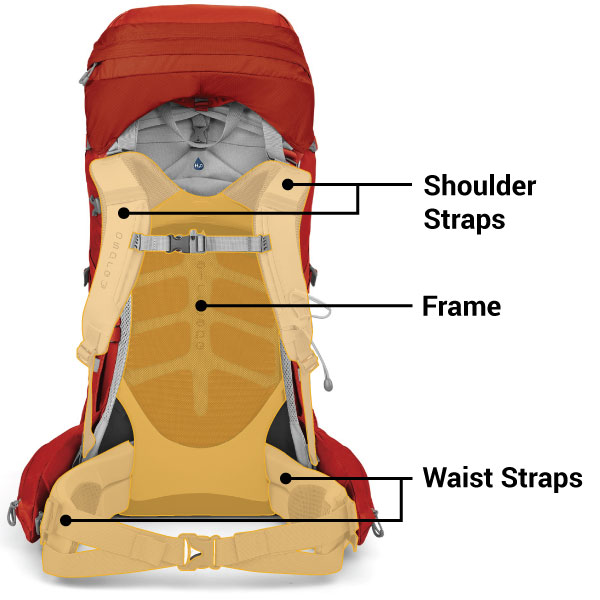
Begin by adjusting the frame size to fit the length of your back. This process requires some trial and error, but once you have it set there is no need to ever change it. For this step we will be using the frame adjustment system (which is unique to each model of backpack), the waist belt, and the shoulder straps.
Make sure the shoulder, load lifter, waist, and shoulder straps are all loosened. Lay your backpack so that it is frame side up, then take a look to determine how to adjust the frame. Each manufacturer uses a slightly different method for adjusting the frame, so you may need to do some probing. Look for a velcro panel, strap, or sleeve that adjust the height of the shoulder straps. Adjust the height of the frame to met your torso length measurement.
Step #2) Try on the Pack
Put the pack on, then tighten the waist belt so that it straddles the middle of your hip bones (half on top, half on the bone.)
Lightly cinch down on the shoulder straps, making sure that about 90% of the weight stays on your hips. Now, take a look to see if there is a space between the top of your shoulders and the shoulder straps. This is a bit of personal preference, but I think backpacks carry best when there is just enough room to slip a finger between my shoulders and the shoulder straps. Some people prefer to have no space at all. Just make sure that the weight stays on your hips, and that there is no more than an inch of space between the strap and the top of your shoulders.
Take the backpack off and adjust the frame size if the spacing is too big or small.
Step #3) Adjust the Remaining Straps
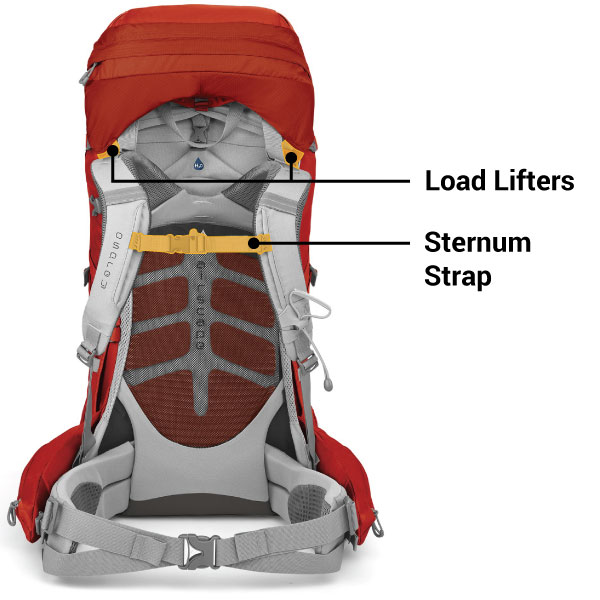
Now you should have the frame size set, the waist belt tight across the middle of your hip bones, and the shoulder straps tightened. Next, snap the sternum strap across the center of your chest. This strap helps pull the weight closer to your body, but can be tightened or loosened based on personal preference. The sternum strap should sit just above your nipple line (for men), and little higher to increase comfort (for women).
The final straps to adjust are called load lifters, though a more appropriate name would be overhead straps. These are the straps that run from the top of the shoulder straps, angling up towards the brain of the pack. These straps pull in the overhead weight of the backpack so that it is not pulling you backwards. The best way to correctly tighten these straps is to look at the angle between the ground and the load lifters. It should be between 45 and 70 degrees. However, there is a measure of personal preference here as well, so adjust as you see fit.
Make Adjustments as you Go
Maintaining a properly fit is a dynamic process that requires making frequent small adjustments. Your body, and pack fitting needs, change in a number of ways throughout the day:
Waist girth reduces as you sweat and lose water weight.
Waist girth increases as you layer on more clothing.
Load changes if you repack or as you drink water.
Terrain changes require adjustment in how closely the pack sits.
And so on...
I am constantly making minor adjustments, especially at the beginning of the day, in search of the perfect fit.
When you have a nicely packed backpack that is also fitted perfectly, you know it. The weight you're carrying will feel like nothing and the miles will fly by beneath your feet.